How To:
Use the Essential Tools of Jewelry Making
Let's begin at the very beginning of jewelry making. The tools! It is imperative to have a set of tools and to understand how to use them in order to successfully construct your pieces of jewelry.
I recommend buying a kit that supplies all of the tools that you need, like the blue kit in the photo above. I will discuss every piece that is in my kit and show you a few more pieces that you may want to purchase in addition to the kit itself.
The first three things you want to have are side wire cutters, round nose pliers and chain/needle nose pliers.
The side wire cutters make it easy to cut wire, trim tiger tail and cut head pins down to the right size.
The round nose pliers are very important to make loops. Especially when creating loops on head pins or eye pins. The graduated cone on the round nose pliers are perfect to create a variety of loop sizes.
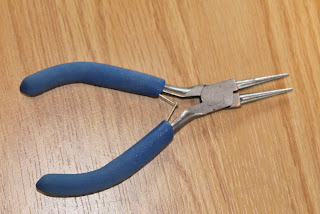
The chain/needle nose pliers have a smooth flat surface and narrow tip to grip and reach into tight places. They can be used to flatten crimp beads (if you do not own a crimping tool), to open and close jump rings, and to bend wire into place. The pair that came in my kit also came with cutters in the center. This makes it easy to bend and cut wire by only using one convenient tool!
For those of you on a budget, you do not want to individually buy each set of pliers, so I suggest getting this wonderful 3-in-1 tool. As you can see, it first comes with side cutters at the very center. Next to the cutters, is a small hole used to crimp tube beads. The end of the tool is the head of round nose pliers. It is also graduated making it easy to make different sized loops.
I would recommend that serious jewelry makers spend the extra money to buy the tools separately, because they tend to be of better quality and work better than the 3-in-1 tool. With that being said, this tool is perfect for those who are just beginning or those who only plan on making a couple of pieces.
These crimping pliers did not come in my kit. They are used to flatten crimp tubes/beads that secure the tiger tail into place on your piece of jewelry. Needle nose pliers would do the trick to flatten the crimp beads, but the crimping pliers give it a more professional finish as it has two notches: one to fold and the other to flatten the tube/bead (instead of just flattening them like the needle nose pliers.)
*Be on the look out for a future blog post on how-to directions of using both the needle nose pliers and the crimping pliers to secure crimp beads!
My kit came with a set of shears (on the right), but they are very sharp and I tend to hurt myself with them more than I actually cut anything. So, I use a pair of scissors. I recommend getting a pair that are smaller and more narrow making it easier to reach in small places to trim any thread. They can also be used to cut cord, leather or suede, since side cutters are typically only useful when cutting wire or tiger tail.
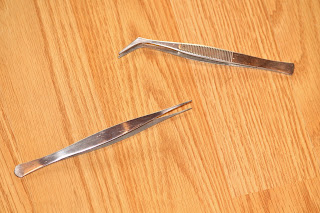
My kit came with a pair of bent nose tweezers (the right), which are useful when needing to pick up small beads. I always drop beads into tiny nooks and the tweezers will always be my go-to tool to help me get them out! I also recommend getting a pair of tweezers that are very narrow (the left) if you plan on creating knots. They can be helpful when positioning those knots between the beads.
This bead reamer came with my kit and it has been a life saver! It is used to make the holes in the beads larger. Many times beads have something blocking or covering the hole (especially the colored coating on glass pearls) making it impossible to string, but if you have a bead reamer, the sharp point can push through the blocking and recreate the hole in the bead.
A bead reamer is not necessary, so if you do not buy a kit with one in it, I would not go out to purchase one. You can simply use a needle or the end of a head pin to push the blockage out of the hole. Since this bead reamer came in my kit, I will continue to use it as it has proven to be pretty convenient!
A fleece beading mat makes the perfect surface to keep your beads from rolling around. I hate losing beads because they roll off of my work table, so this beading mat is essential in the jewelry making process! If you do not have one, you can always use a piece of corduroy fabric or a terrycloth towel. It also helps to have a mat in a neutral color so you can easily see the beads.
Last but certainly not least, you will need a bead design board! I actually have two, the one on the left is the most common type that you will find in any craft or bead store. It has many compartments to hold your beads as you create your piece. I love that it has a built in ruler so you know exactly how long your piece is!* It also has grooves for three rows, making it easy to make jewelry with multiple strands. The only cons are that it is cheaply made and breaks easily. Also, the grooves are not very deep, so if you were to move it your beads will move around and your design may get messed up.
The design board on the right came with my very first bead kit that I received over 7 years ago. I am not sure where you can buy one, but it is wooden and very sturdy! The grooves are also very deep. So, if you have beads on the board and you want to move it they wont roll around and ruin your design. This board also comes with a ruler for easy measurements and has more compartments to hold excess beads than the other design board.
Overall, it does not matter which board you have, because they both get the job done. They keep your beads in one place and help to give you a general idea of how long your piece is going to be when it is finished. This is definitely a necessity in jewelry making!
*Stay tuned for an upcoming blog post on common jewelry sizes!
Some other useful tools to have would be a ruler or tape measure to accurately measure out your string and your final piece. It is also helpful to have craft glue, super glue, or craft cement handy to secure knots into place.
Of course, this is just my personal opinion from my 5+ years of jewelry making experience. These are the tools that help me out every day and never fail. They work for me, and I hope that some of my tips can help you in your jewelry making process too! Please check out my Etsy shop to purchase my jewelry and accessories at http://www.etsy.com/shop/TheBeachBirdBoutique. Thanks for reading and I will talk to you soon!
Artistically Yours,
Brianna
A.K.A. Beach Bird


No comments:
Post a Comment