Wednesday, July 31, 2013

Featured Art: Falcon

Featured Art: The Falcon

Created in August 2009

Done in colored pencil

9" x 12"


This is a photograph of the drawing.

I finished this falcon after my freshman year of high school.  I was 15 years old at the time and about to enter my sophomore year.  This piece took over three months to complete and was completed by August of 2009.  

The process began when I found the photo on page 72 of a nature photography book at my art studio.  The book is called "Wildlife of North America" by Thomas A. Lewis and it is made up of hundreds of wildlife photographs by a dozen photographers or more.  (Copyright 1998 Hugh Lauter Levin Associates, Inc.)   

Using the photo as a reference, I sketched the image into my sketch book.  Once I was satisfied with it, I transferred it using black carbon paper onto a tan colored paper.  

Then, using Prismacolor colored pencils, I started to color the falcon.  The sharp points of the pencils made it easy to obtain the tiny details in the falcon's feathers.  I used what is known as a burnishing effect with the colored pencils.  This means I pushed down very hard to create as much pigment as possible (without breaking the pencil, of course!)  I love using this technique because the finished look appears to have been a painting.  I often get asked if this was done in paint and I politely smile and explain the pencil burnishing technique.

This was definitely one of the most challenging pieces I've made due to the amount of details within the feathers.  I absolutely loved the coloring around his eye and his beak.  That was the most enjoyable part to draw for me.  I also enjoy how the background is a simple blurred green, so it would not distract your focus from the bird itself.

Here are a few photos of the piece as a work in progress.  You can see that I did the hardest part last- the feathers!  They were very time consuming and it was rather difficult to keep track of which feathers I finished on the photo.  So I made a colored copy of the photo that I could write on to keep track of which feathers I had completed on my picture.


This is a photo of the original sketch that I made in my sketch book.  I then transferred it by tracing it over black carbon paper onto a tan colored paper.  You can see that I started to color in the feathers a bright pink to help me keep track of which ones I finished on the tan paper.


This is a photo copy of the image from the book that I used as a reference.  You can see that I outlined the feathers in a bright pink to help me see them better.  Then I colored them in with a purple pencil as I completed them on the tan paper to help me keep track of what I did and did not color yet.  All of those feathers can make your head spin!  So, I highly recommend this technique to keep yourself organized!

Here are two more photos of what the falcon looked liked in progress!  You can see that I saved those challenging feathers for last!


I hope you enjoyed this featured art work!  If you would like to see more posts featuring my other art pieces please leave a comment below!  Don't forget to take a look at my Etsy shop:

Thank you!

Artistically Yours,
Brianna
A.K.A. Beach Bird

Sunday, July 28, 2013

Common Strand Lengths

Common Strand Lengths to Know

This is a chart to show you the most common strand sizes.  This is important to know so you can make your pieces to an accurate length.  Your customers are going to want to know exactly what size their piece is before they purchase it from you.  So here is the chart that I have created after referring to numerous books and sites:

Type
Length
Bracelet
7 inches
Anklet
10 inches
Collar
12-13 inches
Choker
14-16 inches
Princess
17-19 inches
Matinee
20-24 inches
Lanyard
24-34 inches
Opera
28-34 inches
Rope/Lariat
44+ inches

I hope this chart helps you to properly plan out your next piece! Don't forget to stop by my shop at http://www.etsy.com/shop/TheBeachBirdBoutique.  Have a great day!

Artistically Yours,
Brianna
A.K.A. Beach Bird

Thursday, July 25, 2013

Featured Jewelry: Blue Sodalite and Swarovski Crystal Necklace

Featured Jewelry: 

Blue Sodalite and Swarovski Crystal Necklace


This is a beautiful blue Sodalite semi-precious stone necklace with Swarovski crystals and glass pearls!

It is made with the following:
  • 6mm round blue sodalite stones
  • 8mm blue glass pearls
  • 8mm silver plated accent beads
  • 4mm clear Swarovski crystals.  
  • Lobster claw clasp
  • Silver chain
You can easily buy most of these beads at any craft store, such as ACMoore and Michael's.  You could also purchase beads like these from an online vendor or shop.
This necklace is princess length.  It is 18 inches long with a 2 inch lobster claw clasp extension making it a total of 20 inches or matinee length.

This necklace is absolutely breathtaking!  The crystals and silver accent beads sparkle and shine in the sunlight.  The blue sodalite stones and glass pearls look perfect against denim!  The beads are assembled in what is known as an endless pattern, meaning that the pattern repeats itself all the way around the necklace as if to have neither a beginning or an end.  It is a wonderful piece to wear with a fancy blouse or to dress up a pair of denim slacks!

Take a look at a few close up photos of this gorgeous necklace:


You can see the lobster claw clasp and 2" chain extension in this close up.


If you have fallen in love with this necklace, you are in luck because this necklace is for sale in my Etsy shop!  Feel free to take a look: 

I hope you enjoyed today's featured necklace!  Thank you for reading and stay tuned for our next blog post featuring the most common jewelry lengths every jewelry craftsmen should know!

Artistically Yours,
Brianna
A.K.A. Beach Bird

Tuesday, July 23, 2013

How To: Use the Essential Tools

How To: 

Use the Essential Tools of Jewelry Making


Let's begin at the very beginning of jewelry making.  The tools!  It is imperative to have a set of tools and to understand how to use them in order to successfully construct your pieces of jewelry.  


I recommend buying a kit that supplies all of the tools that you need, like the blue kit in the photo above.  I will discuss every piece that is in my kit and show you a few more pieces that you may want to purchase in addition to the kit itself. 

The first three things you want to have are side wire cutters, round nose pliers and chain/needle nose pliers.  


The side wire cutters make it easy to cut wire, trim tiger tail and cut head pins down to the right size. 


The round nose pliers are very important to make loops.  Especially when creating loops on head pins or eye pins.  The graduated cone on the round nose pliers are perfect to create a variety of loop sizes.  


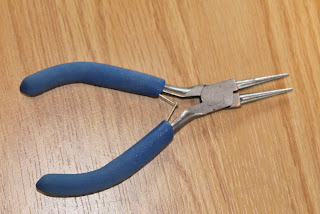
The chain/needle nose pliers have a smooth flat surface and narrow tip to grip and reach into tight places.  They can be used to flatten crimp beads (if you do not own a crimping tool), to open and close jump rings, and to bend wire into place.  The pair that came in my kit also came with cutters in the center.  This makes it easy to bend and cut wire by only using one convenient tool!


For those of you on a budget, you do not want to individually buy each set of pliers, so I suggest getting this wonderful 3-in-1 tool.  As you can see, it first comes with side cutters at the very center.  Next to the cutters, is a small hole used to crimp tube beads.  The end of the tool is the head of round nose pliers.  It is also graduated making it easy to make different sized loops. 

 I would recommend that serious jewelry makers spend the extra money to buy the tools separately, because they tend to be of better quality and work better than the 3-in-1 tool.  With that being said, this tool is perfect for those who are just beginning or those who only plan on making a couple of pieces. 


These crimping pliers did not come in my kit.  They are used to flatten crimp tubes/beads that secure the tiger tail into place on your piece of jewelry.  Needle nose pliers would do the trick to flatten the crimp beads, but the crimping pliers give it a more professional finish as it has two notches: one to fold and the other to flatten the tube/bead (instead of just flattening them like the needle nose pliers.)  

*Be on the look out for a future blog post on how-to directions of using both the needle nose pliers and the crimping pliers to secure crimp beads!


My kit came with a set of shears (on the right), but they are very sharp and I tend to hurt myself with them more than I actually cut anything.  So, I use a pair of scissors.  I recommend getting a pair that are smaller and more narrow making it easier to reach in small places to trim any thread.  They can also be used to cut cord, leather or suede, since side cutters are typically only useful when cutting wire or tiger tail.


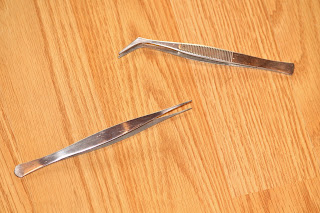
My kit came with a pair of bent nose tweezers (the right), which are useful when needing to pick up small beads.  I always drop beads into tiny nooks and the tweezers will always be my go-to tool to help me get them out!  I also recommend getting a pair of tweezers that are very narrow (the left) if you plan on creating knots.  They can be helpful when positioning those knots between the beads.


This bead reamer came with my kit and it has been a life saver!  It is used to make the holes in the beads larger.  Many times beads have something blocking or covering the hole (especially the colored coating on glass pearls) making it impossible to string, but if you have a bead reamer, the sharp point can push through the blocking and recreate the hole in the bead.

A bead reamer is not necessary, so if you do not buy a kit with one in it, I would not go out to purchase one.  You can simply use a needle or the end of a head pin to push the blockage out of the hole.  Since this bead reamer came in my kit, I will continue to use it as it has proven to be pretty convenient!


A fleece beading mat makes the perfect surface to keep your beads from rolling around.  I hate losing beads because they roll off of my work table, so this beading mat is essential in the jewelry making process!  If you do not have one, you can always use a piece of corduroy fabric or a terrycloth towel.  It also helps to have a mat in a neutral color so you can easily see the beads. 


Last but certainly not least, you will need a bead design board!  I actually have two, the one on the left is the most common type that you will find in any craft or bead store.  It has many compartments to hold your beads as you create your piece.  I love that it has a built in ruler so you know exactly how long your piece is!* It also has grooves for three rows, making it easy to make jewelry with multiple strands.  The only cons are that it is cheaply made and breaks easily.  Also, the grooves are not very deep, so if you were to move it your beads will move around and your design may get messed up.

The design board on the right came with my very first bead kit that I received over 7 years ago.  I am not sure where you can buy one, but it is wooden and very sturdy!  The grooves are also very deep.  So, if you have beads on the board and you want to move it they wont roll around and ruin your design.  This board also comes with a ruler for easy measurements and has more compartments to hold excess beads than the other design board. 

Overall, it does not matter which board you have, because they both get the job done.  They keep your beads in one place and help to give you a general idea of how long your piece is going to be when it is finished.  This is definitely a necessity in jewelry making!

*Stay tuned for an upcoming blog post on common jewelry sizes! 

Some other useful tools to have would be a ruler or tape measure to accurately measure out your string and your final piece.  It is also helpful to have craft glue, super glue, or craft cement handy to secure knots into place.

Of course, this is just my personal opinion from my 5+ years of jewelry making experience.  These are the tools that help me out every day and never fail.  They work for me, and I hope that some of my tips can help you in your jewelry making process too!  Please check out my Etsy shop to purchase my jewelry and accessories at http://www.etsy.com/shop/TheBeachBirdBoutique.  Thanks for reading and I will talk to you soon!

Artistically Yours,
Brianna
A.K.A. Beach Bird 


Saturday, July 20, 2013

Welcome to The Beach Bird Boutique Blogs!

Welcome to The Beach Bird Boutique Blogs!

I want to take the time to introduce myself to you.  My name is Brianna and I live in South Jersey (Yes, it is very different from North Jersey, thus making the distinction!)  I was born with the initials B.B. which led to my nickname, Beach Bird, from my grandfather who lived in Brigantine Beach, NJ.  This nickname is the inspiration behind the name of my shop and blog!  

My artistic life started when I was just 5 years old.  I started taking art lessons at a studio in my town.  I am now 19 years old and teach lessons at this very same studio.  My favorite pieces to do are chalk pastel flowers and colored pencil birds.  I love to recreate photographs and make my picture look as realistic as possible!  Here is a photo of me standing in front of my art work at the 2012 Art Show:


When I was in the 7th grade, I received a jewelry making kit from my Aunt Jenn.  I fell in love with creating my own pieces.  I started to hunt at the local flea market for beaded necklaces that I could take a part and recycle the beads to make my own jewelry.  When I was a freshman in high school I had my first open house.  It was just before the holidays and I invited friends and relatives to buy my handmade jewelry!  Here are some photos of my most recent pieces:

This is a sun-catcher car charm

 This is a slinky-like bracelet

This is a lovely semi-precious stone necklace


After graduating from high school in 2012, I went off to Misericordia University to study in the Doctorate of Physical Therapy program.  It is a 6 and 1/2 year program!  I successfully completed my first year of college and loved every second of it!  I cannot wait to go back in the fall!  Unfortunately, with my school being 3 hours away from home, I was not able to hold my annual jewelry open house.  I still continue to create jewelry, but I don't have anywhere to sell them.  So, my friends recommended joining Etsy.  I finally opened my shop this past week and decided to also start a blog to go with my shop.  You can follow my shop at this link: http://www.etsy.com/shop/TheBeachBirdBoutique

I plan on blogging about simple how-to instructions of jewelry making basics, posting images of new jewelry I have made, and showing instructions on how to make other crafts!  So stay tuned and enjoy!  

Artistically Yours,
Brianna 
A.K.A. Beach Bird