Tuesday, August 20, 2013

Featured Jewelry: Custom Men's Bracelet

Featured Jewelry: Custom Men's Bracelet


A couple of weeks ago, I received an interesting request on Facebook.  The message was from a newly wed asking if I made custom bracelets for men.  I have never done one before, but I knew it couldn't be too hard.  So, I asked her what she wanted me to make for her.  She told me that she found two lovely stones on her honeymoon.  She had hers made into a necklace, but the lady who made hers could not make one for her husband.  So, she asked me to make a bracelet out of the other stone for him.

The bracelet had to fit these requirements:

1) Must attach the stone to a bracelet
2) The bracelet must be leather
3) The leather must be black
4) The wire mustn't be "girly"
5) No studs or extra accents

These requirements were pretty simply, but the first task was the most challenging.  How do you attach a rock to a piece of leather without drilling a hole into it?  I looked up numerous photos and watched tons of YouTube videos to help me on this one.  Unfortunately, every tutorial I watched wanted me to make the stone into a pendant for a NECKLACE!  

I could not figure out how to wrap the stone in wire without putting a loop on it to attach to a necklace.   I then asked the lady if she was 100% sure that she wanted a bracelet and not a necklace.  Of course she came back and said, she thought a necklace would look similar to hers and be too "girly".  She also told me that if I really could not make a bracelet, she would be okay with a keychain instead, but absolutely NO necklace.

I remember almost giving up at this point because I had no idea how to attach that beautiful stone to a piece of leather without ruining it and I also didn't want to settle for a keychain either.  

I finally went into my local craft store, ACMoore to have a look around at what they had in stock.  In the store, I found a piece of leather that was already made into a bracelet!  It had two snap buttons on it and was ready to go!  The best part about it was that it was black and it had slits cut into it.  These slits were perfect because they gave me room to attach the wire wrapped around the stone!

(Here is a photo of the leather I found)


I suddenly felt hopeful that I could make this bracelet and meet all of the requirements she had wanted.  I wrapped the wire around a few times until I got a design on the front of it that I liked.  Then, I took the loose ends of the wire and began to weave them in and out of the slits in the leather.  I made sure that each end of the wire was facing the same direction so they would not stab his wrist. 

(This is what the wire looked like after I wrapped it around the leather) 

To be extra safe about protecting the ends of the wire, I cut a piece of black fabric and glued it over top of the wires.  This fabric would be a barrier between his skin and the wires, to ensure that the wires would not poke or scratch his skin.  Unfortunately, I forgot to take a photo of the fabric covering the wire.

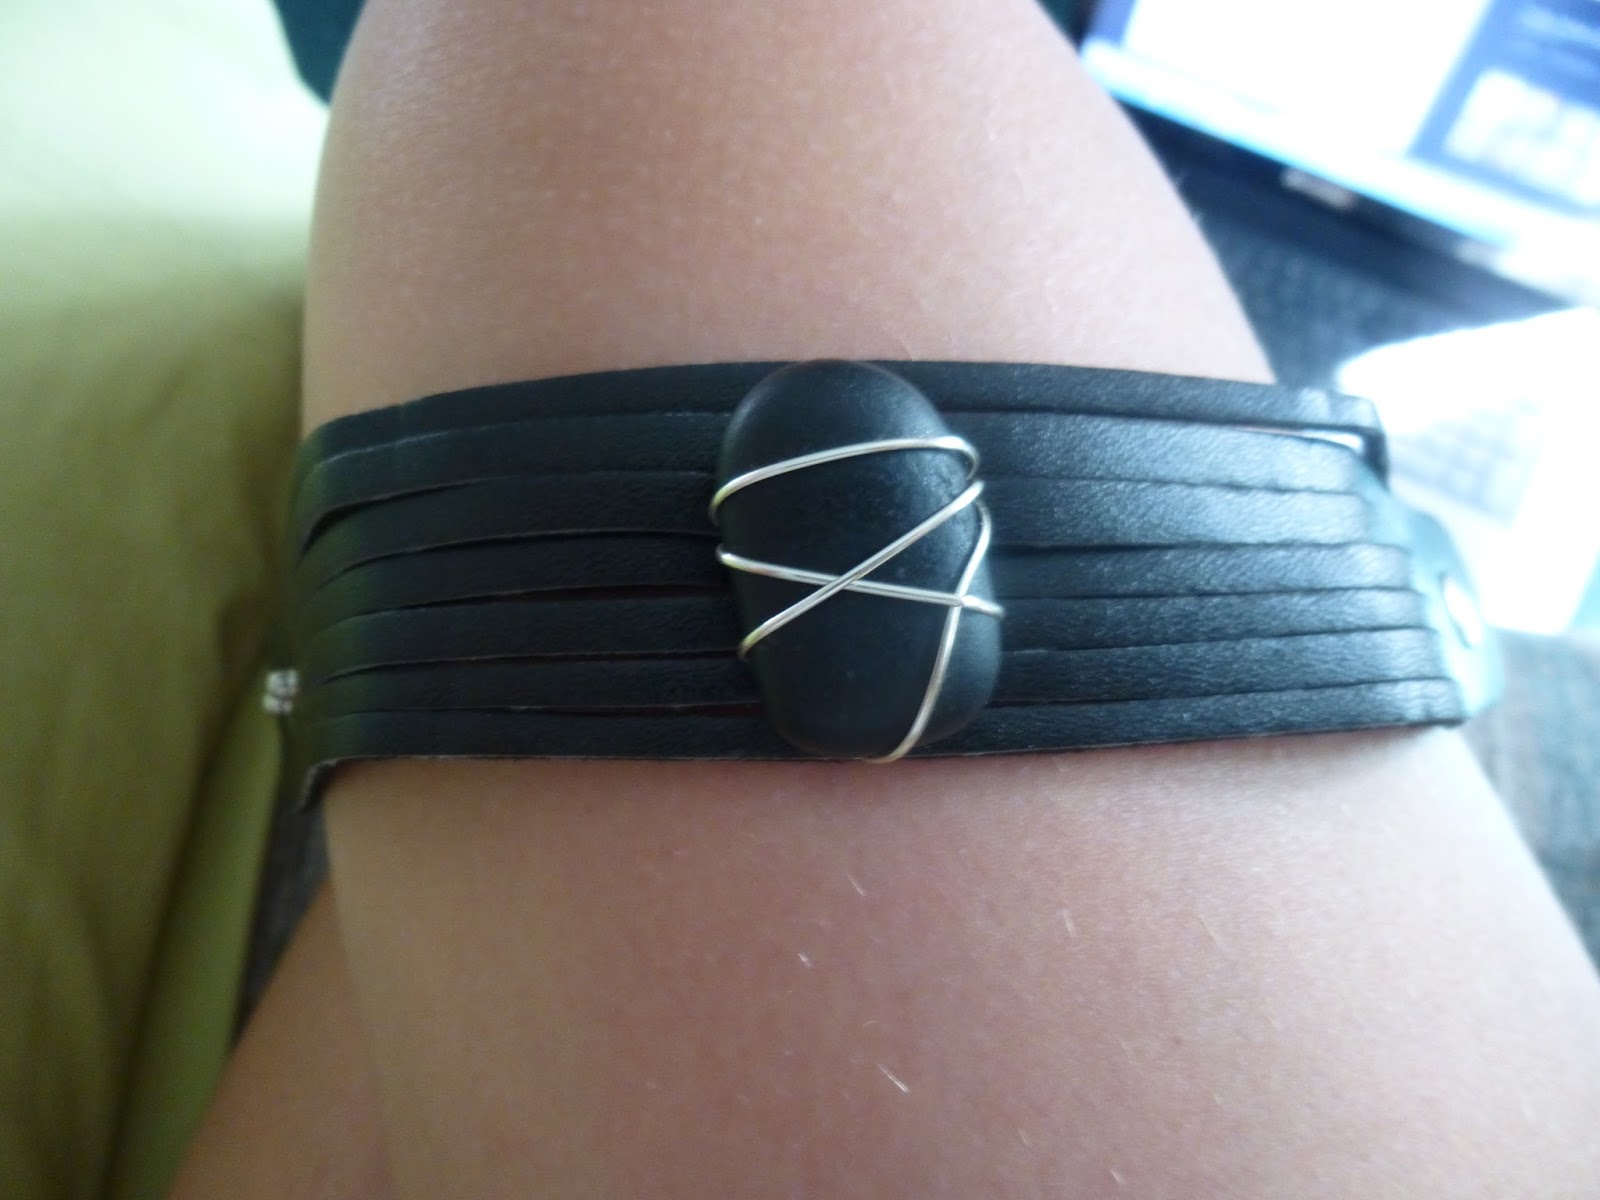
(Here is my dad modeling the bracelet for me)


I was so excited to finally finish this piece and I was so proud of the work I created.  This was my most challenging, but most rewarding piece of jewelry I have ever made.  I loved working on it, because I learned so much through my research of how to wrap the stone.  I am now going to use the skills I just gained to make wire wrapped sea glass necklaces!  So stay tuned for those necklaces to be released next season! 

I couldn't be happier with the results of this bracelet, and the customer was pleased as well.  She informed me that it was perfect and her husband loved it!!! Yay!!!  That is exactly what I like to hear!

If you have any requests for custom jewelry do not hesitate to contact me through this blog or through my Etsy and Facebook sites! 


Artistically Yours,

Brianna

A.K.A. Beach Bird


Tuesday, August 6, 2013

Types of Beads

Types of Beads

Have you ever gone into the jewelry aisle of your craft store and just stare at all of the beads and wonder to yourself, "what have I gotten myself into?"  Yes?  Of course you have!  It can be quite overwhelming, especially if you don't go in with a plan.  There are thousands of beads in different shapes, sizes and colors!  This blog post is to help you understand the different types of beads you will find and what they are used for.  This will hopefully help you the next time you go shopping!  


The first type of beads I want to talk about are crystals.  These are beautiful bicone beads that shine the colors of the rainbow when the light is directly on them.  Most jewelry stores carry Swarovski crystal beads or some sort of Czech crystals.  These are the most common that I've seen.  I LOVE to use crystals to add a little sparkle to my creations.  They can be pretty expensive, but purchasing them in bulk through an online dealer you can usually save a ton!  You can always tell if they are real if they feel like glass.  TIP: Tap the crystal against your teeth to feel if it's plastic or glass.  


These are charms!  Charms are a super cute and easy way to add a little extra to your design.  Whether you use them on a bracelet, bookmark, wine glass charms, car rear view mirror charms, or just put them on an earring, they can be super adorable!  Charms come in so many designs and sizes, so have fun with them!  You can also step it up a notch and buy them in sterling silver or gold!  


These are cylinder glass beads.  If you remember from geometry class the top of the cylinder is a circle.  They are basically tubes.  They can be short or tall, wide or skinny.  I love to use these in necklaces or lanyards because they can take up a lot of space, so I don't have to use as many beads in one piece.  


These are sphere shaped glass beads.  They look like tiny marbles.  They can be anywhere from a tiny 4mm to a large 14mm or larger!  Due to their wide range in sizes they can be used in almost anything you want to make!


These are bicone shaped beads.  They are basically two cones put on top of one another!  Again, these come in a wide range of sizes making them perfect to put in any piece!

Also, the beads don't have to be glass beads to be cylinder, round, bicone, etc.  Some beads come in these shapes that are made of plastic, metal, gemstones, crystals and more!


These are pearls!  They are very beautiful and can be used to add a little shine to your piece or you can make an entire piece using only pearls.  You can buy the real deal at an expensive price or opt for less expensive versions, such as fresh water pearls or glass pearls.  Swarovski makes a line of beautiful glass pearls in addition to their crystals!  I recommend getting glass over plastic pearls because they tend to have better quality and the paint does not chip off as easily as it does on the plastic versions. 


These are probably my favorite due to their name- Briolette beads.  They look like little tear drops and add super cute dangles to any necklace or earring you make!  Again, these come in different sizes so you can use multiple small briolettes or one large one in the middle of a necklace to be used as the focal point.  They make plastic, glass and crystal versions of these.  So choose the type you want, again I recommend the glass or crystal versions as they are better quality. 


These are examples of PLASTIC beads made to look like crystals or glass beads.  You can tell that they are not as shiny and just look fake.  They usually are not made very well and you can see lines on them from the factory that they were made in.  The paint chips off easily and they are not meant to last.  These are fun for little kids to play with, but not for professional pieces of jewelry. 


These are E-beads, they are very small and used as spacers between larger beads.  I love adding those clear E-beads in most of my pieces for extra shine!  They are only about 4mm big.  


If you thought E-beads were small, I introduce you to seed beads!  These tiny beads are only 2mm big.  Again, they can be used as spacers between beads.  I don't use these as often as I use E-beads, but some people love them!  It's just your personal preference. 


These are bugle beads.  I used to use them all the time because of how cheap they are, but now I do not have a clue as to what to do with them.  They are small tubes or cylinder-shaped beads.  I personally don't like to use them, but if you have a purpose for them, go for it! 


The photos show beads that I like to call accent beads.  They are small metal beads that I like to put in my jewelry to add more sparkle!  They can also be used as spacers too.  You can get them in any type of metal.  I recommend sterling silver if you want to make a very professional piece, but for every day pieces I like to use whatever I can find on sale!  


Lastly, we have pendants.  These are the perfect pieces to use as a focal point to a necklace or to put on earrings.  They come in various sizes and styles.  You can use metal, gemstones, briolettes, large crystals and so much more as your pendant! They look beautiful on a beaded necklace or on a simple chain!  

I hope this blog helped you on your next journey to the craft store!  There are hundreds of more beads, but I felt that these are the most common types that you would encounter.  Good luck on your search!  Stay tuned for more tips from The Beach Bird Boutique. 

As always, please take a look at my Etsy shop:


and visit our facebook page for GIVEAWAYS and updates:


Artistically Yours,

Brianna

A.K.A. Beach Bird


Saturday, August 3, 2013

How To: Use the Essential Findings

How To:  Use the Essential Findings

Today's blog post is to explain the different types of essential findings that you can put on your jewelry piece and how to use them. 


There are a ton more findings that you can use, but these are the basics that every jewelry artist should have in their collection.  You may be able to find kits at your local craft store that has several of these findings in them.  Those kits are great to sample everything and see exactly what you like to use!


Here is a photo of chain.  If you plan on working with any metal you will need some chain.  It comes in a variety of sizes, shapes, and colors.  You can get it in sterling silver, gold plated, or more basic metals.  You may also want to add a 2 inch piece of chain to the end of your necklaces to allow your customers to customize the length of their necklace.


These are silver and black rubber eyeglass holders.  Perfect to make an Eyelash leash!  It connects you jewelry piece to the ends of eyeglasses to add a stylish touch! 


You will need clamshell bead tips to finish designs strung on lightweight silk, cotton or linen cord.  When you end the design you will tie a knot with the remaining string.  This knot gets covered by the clamshell bead tips.  the knot is cupped between the two sides of the shell that close together with chain nose pliers. You can then add a clasp to the end with the loop.


These are cord ends and they are used to finish designs that involve leather, ribbon, suede, cotton or other fibers.  You place the material into the cord end and flatten the wings down with chain nose pliers.  you can then attach a clasp to the end with the loop. 


These are split rings.  They do not open very easily and provide a secure attachment due to its tight key ring.


These are called jump rings.  They are small wire rings that link different materials together or attach charms to a chain.  You may be able to see in the photo a small opening in the ring that can easily be opened or closed using needle nose pliers.  They come in a variety of shapes, sizes and colors to suit your needs. 


These are head pins.  You can see that you can get flat head pins (on the left) or a more decorative kind, such as the ball tip head pins (on the right).  The end is what makes a head pin unique.  It is able to stop a bead from falling off.  So after you place your beads on the pin, you end it with a loop and attach it to your chain or clasp.  I recommend getting a larger length like 1.5" or 2" because you can always cut down the pin to make it smaller to suit your beading needs. 


These are eye pins and they are similar to head pins in the way that they have something at the end to stop the beads from falling off, but they are not flat at the end.  Instead they have a loop.  This loop makes it easier to create beaded links, as it eliminates the need to create on of the loops because it is already there.  Again, these come in various sizes and colors but I recommend getting a larger size to be safe. 


These are called crimp beads or crimp tools.  They are used to finish off your designs when you use tiger tail.  You use either flat nose pliers or crimping pliers to flatten these tubes down to keep the tiger tail in place when adding on the clasp.  They come in various sizes and colors, so get ones that match what you are planning on creating. 


If you plan on creating lanyards you are going to need these findings.  They can be used to attach IDs or key rings to the lanyard. 


Now, for the fun part: clasps!!  There are a variety of different styles, shapes and sizes of clasps.  So have fun and get what you think will be best for your creation.  These are magnetic clasps (as you can see they are all stuck to each other!)  They make putting on a piece of jewelry very simple and easy!  Be sure to check the weight limit on the magnets you buy, you don't want your necklace to be too heavy and then the magnets won't stay together.  I typically use magnetic clasps when making lanyards so they have an easy release for nurses or teachers who are required to wear those types of lanyards.


These are not my favorite clasps to use, but they are very basic.  They are called spring rings.  They come in various sizes and colors, but they are very difficult to put on by yourself, so I try not to use these unless requested. 


Again, I also try not to use these barrel clasps because they are hard to put on by yourself.  I only use them when requested.  They come in numerous shapes and sizes, as well. 


Lobster claw clasps are one of my favorites.  They are the best when you add a 2 inch chain extender to your necklace to give your customers a customizable length.  They come in different sizes and colors and are relatively easy to use by yourself!


If you want something a bit fancier, you can use a toggle clasp.  They come in tons of shapes and colors!  They are also pretty easy to use!


Want something more fancy?  Get a decorative toggle clasp like those shown in the picture above.  They can be used as the focal point of a beautiful bracelet!  These add some fun to any piece that you create because they come in all different shapes and sizes!


If you want to design something with multiple strands, I recommend getting a clasp made for multiple strands like the clasps shown in this photo.  This will make it so much easier to create!


There are numerous earring findings as well!  Starting at the top and going clockwise you have a euro lever, a post and clutch, and a fish hook earring finding.  I usually ask my customer what they prefer before I make their earrings.  These also come in different colors and finishes.  Since many people have sensitivity to earrings I try to only buy Sterling Silver or Gold plated earrings. 


Lastly, there are earring hoops!  These come in various sizes and colors!  They can also be used to make wine glass charms!  I will show you how to do that in a future blog.  

I hope that this blog helped you out when starting your own jewelry creations!  Like I said before, there are an infinite amount of findings, these are just the basics you will need to get started.  

As always, please take a look at my Etsy shop:


and visit our facebook page for GIVEAWAYS and updates:


Artistically Yours,
Brianna
A.K.A. Beach Bird